
Integrating Sentry with JavaScript
Sentry-JavaScript
Sentry is an open-source project for capturing product errors. It supports many languages and frameworks.
This post only covers the frontend JavaScript side.
At our company, a lot of projects used kibana for stats. That did not tell us how the app was actually running. When a customer hit an error or a crash in a product we built, they had to contact support, who then handed it to us to reproduce and fix. Without concrete data, reproduction took a long time.
Sentry is for that pain point. It lets us pin down the root cause quickly, ship a fix, and spend time on new features instead of reproducing bugs.
JavaScript
Setup
Sentry hooks error functions to capture errors, so we can drop it into an existing project with almost no overhead.
Here are the basic steps for combining React and Sentry.
React:
#SentryBoundary.jsimport { Component } from "react";import Raven from "raven-js";
export default class SentryBoundary extends Component {  constructor(props) {    super(props);    this.state = { error: null };  }
  componentDidCatch(error, errorInfo) {    this.setState({ error });    // send the error info    Raven.captureException(error, { extra: errorInfo });  }
render() { if (this.state.error) { // this can be written as a component; when it crashes, the crashed component can be replaced console.log("React Error"); } return this.props.children; }}#index.jsRaven.config("DSN", { release: release,}).install();
ReactDOM.render( <div> <SentryBoundary> <App /> </SentryBoundary> </div>, document.getElementById("root"));Upload source-map
If the code above is in place, the app can capture errors. One problem remains: most of our projects bundle with webpack, and the bundled code is minified. We cannot tell where an error was thrown. So we upload source-map files together with the minified files to the Sentry server, so we can find the original location quickly.
Configuring and running that upload is tedious. It is also the hard part of wiring a project to Sentry.
There are currently two ways to upload source maps:
- Use Sentry’s Webpack plugin. Not very flexible.
- Use
sentry-cli. More flexible; you can configure it per project.
The setup is tedious, so I will not go through it here. For a full React + Sentry example, see my GitHub repo: react-sentry-demo (opens in a new tab). Every option is documented. For source-map upload I used the second approach and wrote a script that builds, checks the environment, checks auth, uploads source maps, and deletes local source maps. It is automated. You can copy the script into an existing project with small changes.
The core upload command:
sentry-cli releases files v1.8 upload-sourcemaps {directory containing the js and js.map files; if not found, sentry will traverse its subdirectories} --url-prefix '~/{filter rule}'`;How it works
JavaScript has window.onerror. Sentry’s core capture on the frontend is rewriting that method so every error is caught. The idea looks like this:
let _winError = window.onerror;window.onerror = function (message, url, lineNo, colNo, errorObj) { console.log(` Error message: ${message} Error file URL: ${url} Error line: ${lineNo} Error column: ${colNo} Error details: ${errorObj}`);}Then Sentry collects non-error data such as user-agent, browser info, OS info, and custom fields, runs them through Sentry’s lifecycle hooks, and sends the payload to the Sentry server for display.
Compatibility
The compatibility in question is really window.onerror compatibility.
Runtime compatibility
| Environment | message | url | lineNo | colNo | errorObj | | ———————– | : —–: | : —: | : ––: | : —: | : ——: | | Firefox | ✓ | ✓ | ✓ | ✓ | ✓ | | Chrom | ✓ | ✓ | ✓ | ✓ | ✓ | | Edge | ✓ | ✓ | ✓ | ✓ | ✓ | | IE 11 | ✓ | ✓ | ✓ | ✓ | ✓ | | IE 10 | ✓ | ✓ | ✓ | ✓ | | | IE 9 | ✓ | ✓ | ✓ | ✓ | | | IE 8 | ✓ | ✓ | ✓ | | | | Safari 10 and up | ✓ | ✓ | ✓ | ✓ | ✓ | | Safari 9 | ✓ | ✓ | ✓ | ✓ | | | Opera 15+ | ✓ | ✓ | ✓ | ✓ | ✓ | | Android Browser 4.4 | ✓ | ✓ | ✓ | ✓ | | | Android Browser 4 - 4.3 | ✓ | ✓ | | | | | WeChat webview (Android)| ✓ | ✓ | ✓ | ✓ | | | WeChat webview (iOS) | ✓ | ✓ | ✓ | ✓ | ✓ | | WKWebview | ✓ | ✓ | ✓ | ✓ | ✓ | | UIWebview | ✓ | ✓ | ✓ | ✓ | ✓ |
Tag compatibility
| Tag | Can window.onerror capture it |
|---|---|
| img | yes |
| script | You need to add the crossorigin attribute on the script tag, and the server must allow CORS. Without that attribute, the error message is only Script error. |
| css | no |
| iframe | no |
Most browsers support the method. Some runtimes lack colNo and errorObj. Sentry already handles that, so you do not need to worry. The error display is just a bit incomplete.
What it can capture
Error info
From the sketch above, the core capture is window.onerror. Anything it can catch is sent to Sentry.
Besides Promise, window.onerror captures basically every error that shows up in the console: runtime errors, including syntax errors.
To capture Promise errors, you can use:
window.addEventListener('unhandledrejection', event => {})
Compatibility is not great. Currently only the WebKit kernel supports this event.
The following code is something this method can catch:
const p = new Promise((reslove, reject) => reject('Error'))p.then(data => { console.log(data)})// the Promise triggered its reject callback but no catch handled it, which causes the errorBreadcrumbs
- Ajax requests
- URL changes
- UI click and keydown DOM events
- console output
- Previous errors
- Custom breadcrumbs
Display
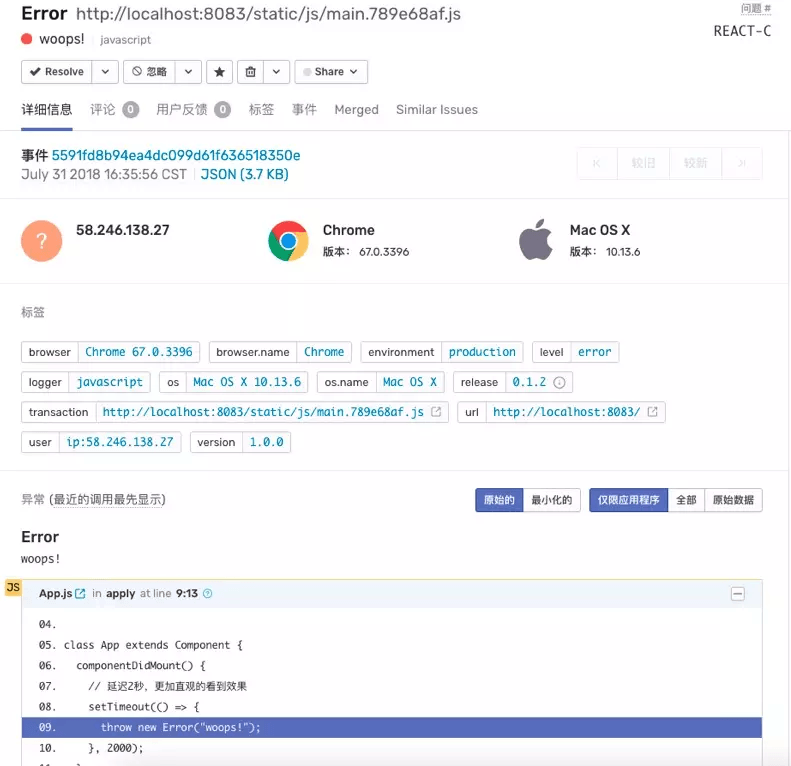
Electron integration
This is not about capturing errors inside the Electron app. It is about crashes. Electron is only a container. The content is still a JavaScript app.
Setup
As above, this only captures Electron crash info. When Electron crashes, it fires crashReporter.start. We configure Sentry there:
import { crashReporter } from 'electron'
crashReporter.start({  productName: 'aoc-desktop',  companyName: 'alo7',  submitURL:    'https://sentry.com/api/15376/minidump/?sentry_key=3e05fa101f035008e953ff56909b8eb',  // the minidump endpoint provided by sentry  extra: {    // extra info  }})
After that, you can use process.crash() to simulate a crash and check whether Sentry received it.
Upload symbols
Earlier we uploaded source maps. Here we upload symbols. Think of a symbol file as another kind of source map.
Symbol formats (extensions) vary. On Mac it is dSYM. On Windows it is pdb. Sentry does not support uploading pdb yet. You need dump_syms.exe to convert pdb to sym, then upload that to Sentry. After that, a crash in Sentry shows the crash context:
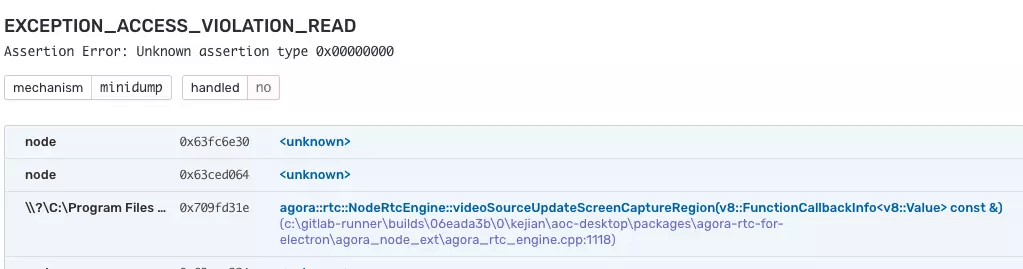
That lets you pinpoint where it went wrong.
How source-map matching works
When the Sentry server receives a source map, it matches it using the url-prefix you passed on upload, the source-map file, and the runtime JS file. The flow:
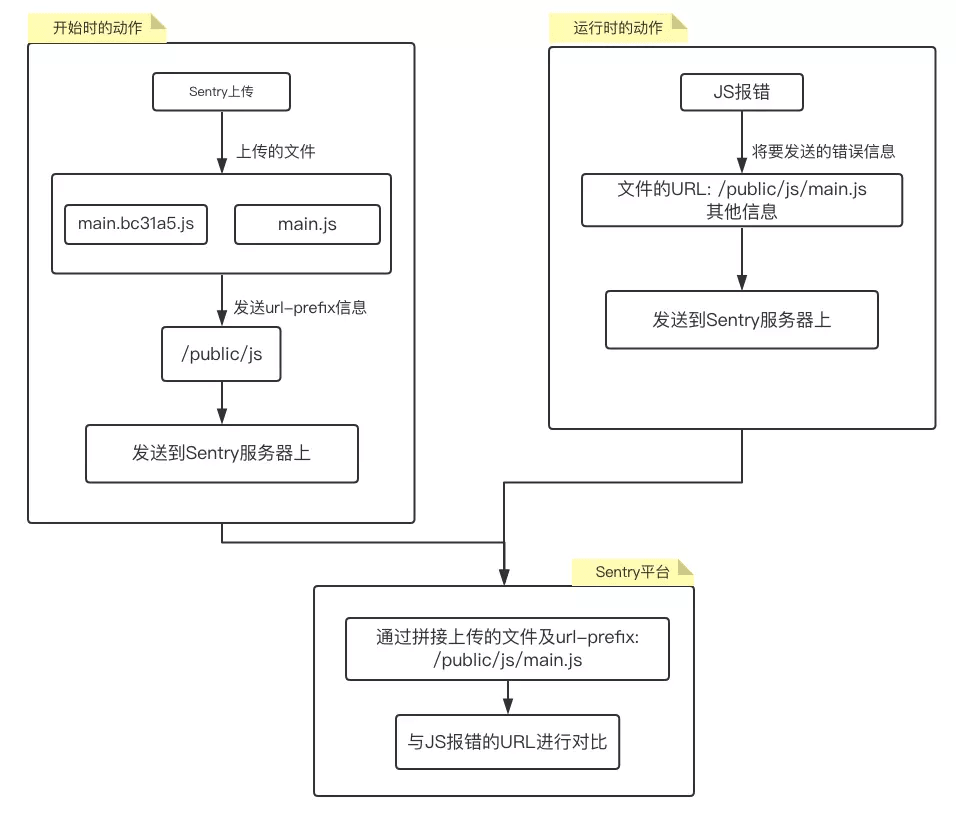
Reply to this post on X (opens in a new tab)View as Markdown