
Podman basics and how it talks to containers
Podman is a daemonless open-source container engine. Unlike Docker, Podman does not need a daemon; it manages containers through the libpod library. That avoids some of Docker’s security issues: Docker’s daemon needs root, while Podman can manage containers as a regular user.
Architecture sketch
podman has two parts: the podman client and the libpod library. Think of them as frontend and backend. Every container operation goes through libpod. What the podman client does is send the user’s command to libpod.
Note that libpod only has a Linux build, so it only runs on Linux. How it runs on Windows and MacOS is in the next section.
Machine
Podman has a machine command that starts a Linux VM to run containers. That also avoids needing root when you run containers in Podman.
Currently podman supports 4 VM types:
- qemu
- applehv
- hyperv
- wsl2
On Linux, machine is optional. On Windows and MacOS, machine is required.
- On Windows, the default VM type is
wsl2;hypervis optional - On MacOS, the VM type is
qemu;applehvis still in development (as of 2023.08) - On Linux, if you start a VM, the type is
qemu
The VM that machine starts is Fedora Linux.
machine also downloads the Fedora Linux image automatically, so the first podman machine init is slow (you can download it yourself and pass --image-path).
If you run init without --image-path, podman always tries to fetch the latest Fedora image. The rules:
- If there is a local cache and it matches the latest image, it does not download
- The cache keeps only one version, and deletes it after two weeks.
Fedora Linux ships podman, so on Windows and MacOS the podman command you run actually connects to a socket file in the VM over gvp or ssh, and the socket file forwards the request to libpod. See:
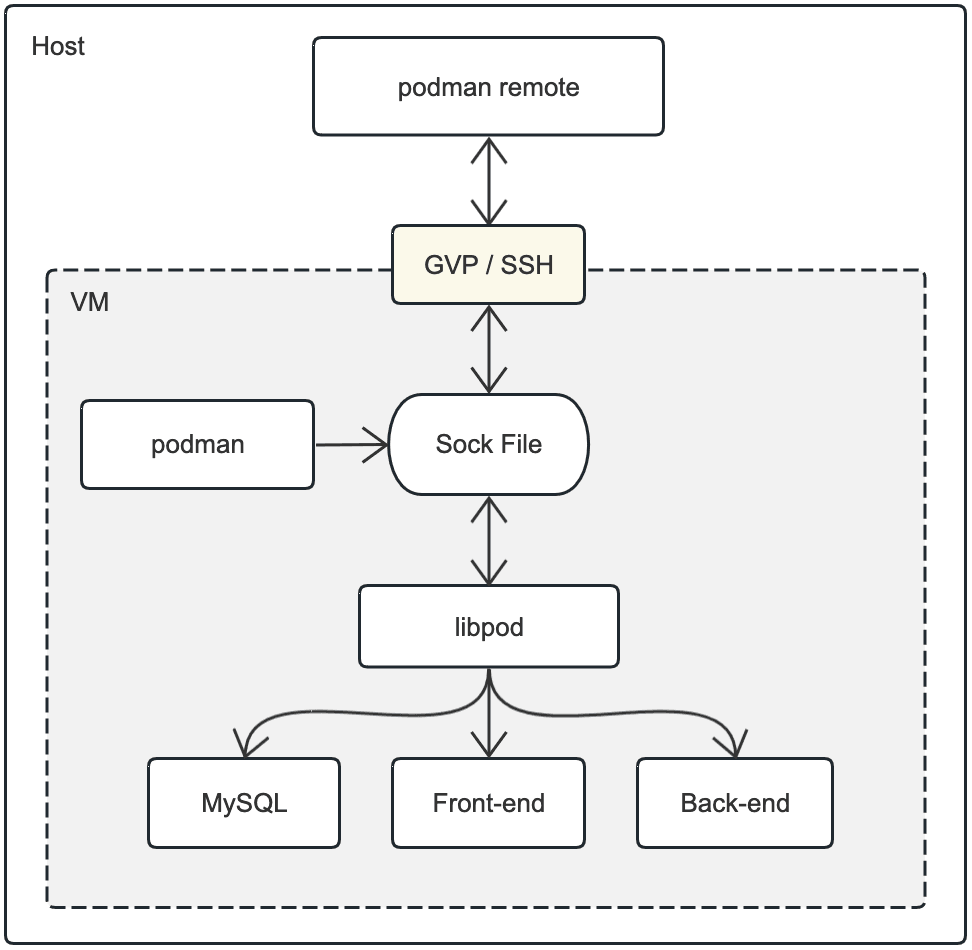
podman remote in the figure is the podman command on the host. It is written that way because on Windows and MacOS, podman always runs in remote mode. (On Linux you can pass --remote to enter this mode.)
Communication
In the figure above, one block is GVP / SSH. That is how the host and the VM talk. Before GVP, you need to understand how SSH communication works. That helps with GVP.
SSH
When you podman machine init and podman machine start, podman starts an ssh service in the VM.
You can inspect the connection with podman system connection ls --format=json:1
[ { "Name": "podman-machine-default", "URI": "ssh://core@127.0.0.1:65489/run/user/502/podman/podman.sock", "Identity": "/Users/black-hole/.ssh/podman-machine-default", "IsMachine": true, "Default": true }, { "Name": "podman-machine-default-root", "URI": "ssh://root@127.0.0.1:65489/run/podman/podman.sock", "Identity": "/Users/black-hole/.ssh/podman-machine-default", "IsMachine": true, "Default": false }]The URI is ssh://core@127.0.0.1:65489/run/user/502/podman/podman.sock. We can use this socket file to reach libpod in the VM.
When podman sends a request, it first opens an ssh connection, then sends the request over the ssh channel. A sketch:
import (  "context"  "fmt"  "net"  "net/http"  "net/url"
  "github.com/containers/common/pkg/ssh")
func main() {  uri := "ssh://core@127.0.0.1:65489/run/user/502/podman/podman.sock"  _url, _ := url.Parse(uri)  conn, _ := ssh.Dial(&ssh.ConnectionDialOptions{    Host:                        uri,    Identity:                    "/Users/black-hole/.ssh/podman-machine-default",    User:                        _url.User,    Port:                        65489,    InsecureIsMachineConnection: false,  }, "golang")
  client := &http.Client{Transport: &http.Transport{DialContext: func(ctx context.Context, _, _ string) (net.Conn, error) {    return ssh.DialNet(conn, "unix", _url)  }}}
  resp, _ := client.Get("http://d/v4.6.0/libpod/_ping")  fmt.Println(resp.StatusCode)}
This is the Windows behavior. On MacOS the default is GVP.
On Windows, every CLI operation that touches containers or images goes through this.
GVP (gvisor-tap-vsock)
One reason for GVP is to stop having to ssh into the VM every time and to take over API forwarding.2
In short, it forwards traffic from a socket file on the host to a socket file in the VM.
podman first creates a socket file on the host, then starts qemu with -qmp to expose qemu’s socket file, then binds the host socket file to qemu’s socket file via GVP. Simplified:
gvproxy -listen-qemu unix:///var/folders/zm/g19w916x2x36bt16htrwtsh80000gp/T/podman/qmp_podman-machine-default.sock -forward-sock /Users/black-hole/.local/share/containers/podman/machine/qemu/podman.sock -forward-dest /run/user/502/podman/podman.sock
qemu-system-x86_64 -qmp unix:/var/folders/zm/g19w916x2x36bt16htrwtsh80000gp/T/podman/qmp_podman-machine-default.sock,server=on,wait=off -virtfs local,path=/var/folders,mount_tag=vol2,security_model=none
On MacOS, podman also ships the podman-mac-helper executable in the pkg installer.
When you podman machine start, podman checks for podman-mac-helper. If it exists, podman-mac-helper creates a symlink /var/run/docker.sock pointing at the host socket file.
API forwarding
Before we start, think about how you would call the podman API from your program.
MacOS
On MacOS you can run: export DOCKER_HOST='unix:///Users/black-hole/.local/share/containers/podman/machine/qemu/podman.sock' so later podman commands talk through the local socket file.
You can also call the API on that socket file:
curl --unix-socket /Users/black-hole/.local/share/containers/podman/machine/qemu/podman.sock http://d/v4.6.0/libpod/_pingWindows
Windows has no socket file. API calls still matter, so the podman team ships win-sshproxy.exe to forward API requests.
win-sshproxy creates a duplex pipe with Windows Named Pipe, which you can treat as a socket file.3
Creating the Named Pipe is simple:
// Allow built-in admins and system/kernel componentsconst SddlDevObjSysAllAdmAll = "D:P(A;;GA;;;SY)(A;;GA;;;BA)"
func ListenNpipe(socketURI *url.URL) (net.Listener, error) {  user, _ := user.Current()
  // Also allow current user  sddl := fmt.Sprintf("%s(A;;GA;;;%s)", SddlDevObjSysAllAdmAll, user.Uid)  config := winio.PipeConfig{    SecurityDescriptor: sddl,    MessageMode:        true,    InputBufferSize:    65536,    OutputBufferSize:   65536,  }  path := strings.Replace(socketURI.Path, "/", "\\", -1)    return winio.ListenPipe(path, &config)}
After the Named Pipe exists, win-sshproxy opens an ssh connection and binds it to the Named Pipe:
func main() {    complete := new(sync.WaitGroup)  complete.Add(2)    go forward(ssh, namedPipe, complete)  go forward(namedPipe, ssh, complete)
  go func() {    complete.Wait()    ssh.Close()    namedPipe.Close()  }()}
func forward(src io.ReadCloser, dest CloseWriteStream, complete *sync.WaitGroup) {  defer complete.Done()  _, _ = io.Copy(dest, src)
  // make the io.Copy() on the other end exit  _ = dest.CloseWrite()}
From then on the host can forward API requests through the Named Pipe. JS example:
require('http').get({ hostname: 'd', path: '/v4.6.0/libpod/_ping', socketPath: '//./pipe/docker_engine',}, res => { console.log(`statusCode: ${res.statusCode}`) res.destroy();}).end();Footnotes
Reply to this post on X (opens in a new tab)View as Markdown